Kutch embroidery
I can picture in my mind those Kutchi women sitting in their doorstep doing these beautiful intricate embroideries all the while waiting for their men gone cattle grazing.When you think of those women you cannot even imagine a dull colour – they are all ablaze in colours, all their dresses fully embellished with delicate fine embroideries.The backdrop of desert and all that colour – beautiful.
The Kutchi embroidery designs have a long history and are said to have been brought to India by Arab traders. The Maltese cross design used in these works has strong resemblance to designs found elsewhere in the Gulf. Armenian embroidery site has some instructions which looks almost like those for Kutch embroidery
There are many kinds of Kutchi embroidery. Chain stitch done with mirrors in floral designs is a very recurrent work we have seen everywhere be it shawls or dupattas, done from the kutch area. Many a wedding trousseau have these beautiful designs embroidered on them.This work is also called Sindhi embroidery.
The Kutch embroidery detailed here uses small squares placed artistically and embroidered in bright colours. Lively colours like Yellow, Red, Black, and Blue are mainly used. A herringbone stitch is used for the outline.It is then interlaced or filled with another thread ( Thread is looped around the herringbone stitch)
The Kutchi work can be used to decorate any of your dresses- be it a plain cotton sari, which you can do some border with this work or a shawl which you can decorate with single motifs. A salwar kameez with kutchi work done on the necklines would look absolutely gorgeous. I would love to have a silk blouse with this work done throughout on it. Kutchi work embroidery design can be modernised by use of Pastel colours rather than the bright colours used traditionally. You can embellish purses, shawls, Kurtis, dresses, pouches, mojris, backpacks, jackets with the kutch work designs.
Step by Step instructions to stitch Kutchi motif
Step 1. Draw the design on fabric . The kutch embroidery designs are basically many small squares attractively placed, be it as independent motifs or as border designs.
I would recommend that you use graph paper when drawing these squares. It is essential that all these squares are of the same size. Small squares with 1.5 inch sides work very well. These squares fill up fully with the interwoven thread.
I have given below various designs you can use for this embroidery. They are all variations of the basic maltese cross design arranged in various ways.
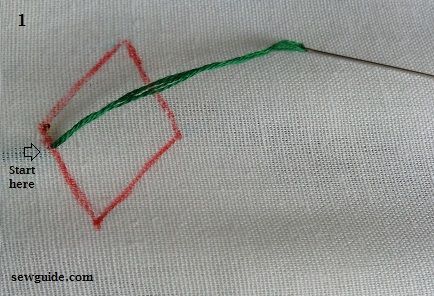
Step 2. Start the outline stitch.
You need two strands of embroidery thread on your sharp needle for the outline stitch.
At the top and bottom corners of the design the needle goes to the back and comes out a little down from the corner, exactly to the either sides of the corner, crossing the first thread, as shown in the picture. While going to each corner, remember that the needle and thread are passed under the existing thread all the time.
First work a row with herringbone stitches as per the step given in the picture below and complete till 6, now go back following 6- 12
When we are doing several squares together you can stitch outline in a different pattern as shown in the diagram below. The outline is first started from left to right and when one row is done, come back from right to left, finishing the outlines.
This is the basic building block of all kutch work of this style. Next we have to weave a different or same colour thread through this outline, filling it up.
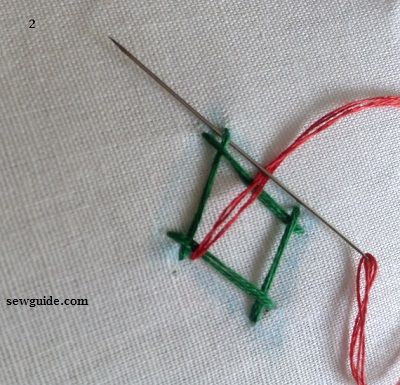
Step 3. Interweaving – A different bright coloured thread is interlaced or weaved through the motif. This contrasting or same colour thread encloses the corners. For the weaving part it is better to use a blunt needle.We donot penetrate the fabric after first anchoring the thread.
Bring up the needle and thread to the front of the fabric.
Go up an bring the needle from right side below to between the cross made by the stitches.
Guide the needle under the left outline stitch and the interweaving thread. Bring up. Now that corner is enclosed in a loop made by the interweaving thread.
The basic kutch design with the five squares can be arranged in n number of ways to create new designs and patterns. Let the designer in you decide on the best design for your next dress. The five square design is worked in a distinct way as detailed below.
You just have to follow the pattern with the needle and thread to the numbers given.
Mirrors are attached to Kutch embroidery to give it a beautiful appeal. It is a very popular work.
Source: sewguide.com


